

To install WordPress on your VPS, first, choose a reliable provider and set up your VPS with a suitable operating system. Configure basic settings, then update the system and secure it. Download WordPress and create a database using MySQL. Upload the WordPress files via SFTP, edit the 'wp-config.php' for your database details, and run the installation script in your browser. If you're curious about post-installation optimizations and security measures, there's more to explore!
Key Takeaways
- Choose a suitable operating system for your VPS, such as Ubuntu or CentOS, to host WordPress effectively.
- Download the latest version of WordPress and upload the files to your VPS using SFTP.
- Create a MySQL database and user, then configure the 'wp-config.php' file with the database credentials.
- Run the WordPress installation script through your web browser to finalize the setup process.
- Ensure regular updates and backups post-installation to maintain security and site integrity.
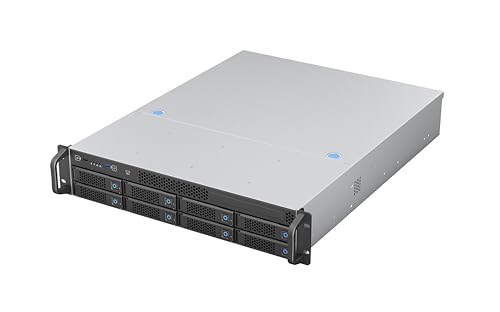
Rosewill 2U Rackmount Server Chassis | Supports up to 8 3.5" 12Gbps Hot Swap SATA/SAS | E-ATX Compatible | 2U/CRPS PSU | 3 x 8038 PWM Fan | USB 3.2 Type-C | RSV-H208
High-Density, High-Speed Storage Platform: Hosts eight 12Gbps hot-swap drive bays in a compact 2U form, delivering exceptional storage...
As an affiliate, we earn on qualifying purchases.
Understanding VPS and WordPress
When you're considering hosting your WordPress site, understanding the role of a Virtual Private Server (VPS) is crucial.
A VPS divides a physical server into multiple virtual servers using virtualization technology, giving you dedicated resources like CPU, RAM, and storage. This setup ensures your site operates independently, maintaining consistent performance even during high traffic.
With full administrative access, you can customize server configurations to suit your needs. Plus, the isolated environment enhances security, protecting your data from the activities of other users.
As your site grows, VPS hosting allows for easy scalability, making it a cost-effective choice that balances control and expense compared to dedicated hosting.
It's an ideal solution for serious WordPress users.

Rosewill 2U Server Chassis Rackmount Case | 4 3.5" HDD Bays | Micro-ATX Compatible |3 x 80mm PWM Fans | 2X USB 3.0 | Silver/Black - RSV-Z2600U
Roomy Chassis: 2U server case with 4 internal 3.5" HDD bays and 1 extra 5.25" device slot.
As an affiliate, we earn on qualifying purchases.
Choosing the Right VPS Provider
Selecting the right VPS provider is essential for ensuring your WordPress site runs smoothly and efficiently. Start by evaluating performance factors like scalability and speed.
Look for providers that offer easy scalability and utilize NVMe storage for faster data access. You should also prioritize those with a 99.9% uptime guarantee and ample bandwidth options.
Next, consider ease of use with user-friendly control panels and one-click installers for WordPress. Managed services are great for less technical users.
Security is another key aspect; choose providers with multiple data center locations, free SSL certificates, and robust security tools.
Finally, compare pricing models and resource allocations to ensure you get the best value for your investment.

RackChoice Server case MicroATX/Mini-ITX 2U Rackmount Server Chassis max 7x3.5 Bay / USB3.0 with 2.0 Adapter Support ATX PSU Either top or Side Cooling Depth 15.7"
M/B size: Micro-ATX 9.6 x 9.6 / mini-itx 6.7 x 6.7
As an affiliate, we earn on qualifying purchases.
Deploying Your VPS
Once you've chosen a VPS provider, the next step is deploying your VPS effectively to set a solid foundation for your WordPress site.
Start by selecting an appropriate operating system like Ubuntu or CentOS, and configure basic settings such as the hostname and network.
Don't forget to update the system with the latest patches for security.
Setting up a firewall is crucial, so restrict access and enable secure SSH connections.
Change default passwords, disable root login via SSH, and implement SSH keys for added protection.
Regularly monitor CPU, RAM, and disk usage to ensure optimal performance, and consider using caching solutions.
Finally, establish a backup routine and use monitoring tools to keep an eye on system performance.

Rosewill 2U Server Chassis Rackmount Case | 4 3.5"/2.5" HDD, 1 5.25" Device | Micro-ATX Compatible | 2 x 80mm PWM Fans | 2X USB 3.0 | Silver/Black - RSV-Z2700U
Roomy Chassis: This 2U server case has 4 internal 3.5” HDD bays plus room for 1 additional 5.25”...
As an affiliate, we earn on qualifying purchases.
Preparing the VPS Environment

Before diving into the installation of WordPress, it's essential to prepare your VPS environment properly. Start by choosing a reliable VPS provider like Vultr or DigitalOcean, ensuring they support your desired operating system and offer good performance and pricing.
Evaluate factors like server location, customer support, and scalability options.
Once you've selected a provider, install a stable operating system such as CentOS or Ubuntu. Configure your network settings, update the OS for security patches, and set up a firewall.
Install necessary software, including an HTTP server like Apache or Nginx, a database management system like MariaDB or MySQL, and PHP with required extensions.
Finally, secure your environment by setting strong passwords and limiting user privileges.
Manual Installation of WordPress

With your VPS environment prepared, you're ready to manually install WordPress. First, download the latest version from the official WordPress website.
Next, create a new MySQL database and user, and make sure to record the login details.
Using SFTP, establish a secure connection to your VPS and upload the extracted WordPress files.
Don't forget to edit the 'wp-config.php' file with your database credentials.
Once that's done, run the WordPress installation script via your web browser.
Follow the prompts to select your language and generate security keys.
Finally, complete the setup by configuring your site title, admin user, and password.
You're now ready to log in to your WordPress dashboard!
Using Cpanel for Installation
If you're looking for a straightforward way to install WordPress, using cPanel can make the process much simpler.
First, ensure that cPanel is set up and accessible. Once you're in, locate the Softaculous Apps Installer. Here, you can choose your protocol (HTTP or HTTPS) and select the domain for your installation. If you're not using an automatic installer, set up the database and configure the database user and password.
Softaculous streamlines the process by automatically creating databases and settings, allowing you to select the WordPress version and plugins you need.
With cPanel's user-friendly interface, managing multiple websites becomes effortless, and you'll also benefit from security features and automatic backup tools to keep your installations safe.
Exploring Automatic Installation Options
How can you simplify the WordPress installation process on your VPS?
You can take advantage of automatic installation options like Softaculous, Vultr's one-click installation, or SPanel with SWordPress.
Softaculous supports over 400 applications and installs WordPress in just a few clicks, handling database configurations and file uploads seamlessly.
If you choose Vultr, their one-click installation uses the latest CentOS version and sets up WordPress automatically with minimal effort on your part.
SPanel offers a user-friendly interface that simplifies management, allowing you to clone installations and manage updates easily.
Alternatively, consider managed VPS hosting, where the provider handles the WordPress installation and ongoing maintenance, so you can focus on your site's content instead of technical details.
Post-Installation Tasks
After installing WordPress on your VPS, it's crucial to tackle several post-installation tasks that will enhance your site's performance, security, and user experience.
First, update the WordPress core to apply essential security patches. Next, install security plugins like Wordfence or MalCare to bolster your defenses.
Ensure all user accounts have strong, unique passwords and consider limiting login attempts to thwart brute-force attacks. Monitor site activity regularly for any suspicious behavior.
Choose a theme that aligns with your site's purpose, and install essential plugins for SEO and caching.
Create engaging content and organize your navigation for improved user experience.
Finally, optimize media by compressing images to boost page load times, setting the stage for a successful site.
Performance Optimization Strategies

To ensure your WordPress site runs smoothly and efficiently, implementing performance optimization strategies is essential.
Start by configuring your server with performance-optimized software like Nginx or Apache, and make sure you're using the latest PHP and MySQL versions. Opt for SSD storage and choose a Linux operating system for optimal stability.
Next, leverage caching mechanisms such as WP Super Cache and server-level caching tools to minimize server load.
Don't forget to compress images with plugins like Smush and select lightweight themes.
Regularly monitor your site's performance using tools like Google PageSpeed Insights, and keep your software updated.
Lastly, enable Gzip compression to enhance page load times, ensuring your visitors enjoy a fast and responsive experience.
Implementing Security Measures

While setting up your WordPress site on a VPS, prioritizing security measures is crucial to protect your data and maintain site integrity.
Start by configuring a firewall to block unauthorized access and securing SSH with key authentication.
Integrate Fail2ban to detect and block suspicious login attempts.
Regularly update your server and WordPress core, themes, and plugins for the latest security patches.
Use strong, unique passwords and consider two-factor authentication for added protection.
Limit login attempts to prevent brute-force attacks and install a Web Application Firewall (WAF) to safeguard against common threats.
Finally, create regular backups and monitor logs to detect unusual activity.
Staying proactive ensures your site remains secure over time.
Frequently Asked Questions
What Are the Costs Associated With VPS Hosting?
When considering VPS hosting, you'll encounter various costs that depend on several factors.
Basic plans can start around $4 monthly, while more advanced options might exceed $20.
If you choose SSD storage for better performance, expect higher prices.
Managed VPS plans add to your costs due to included services.
Opting for longer-term contracts can save you money, and monitoring your resource usage helps avoid unnecessary expenses.
How Do I Back up My WordPress Site on VPS?
When it comes to backing up your WordPress site on a VPS, you've got a few solid options at your fingertips.
You can use plugins like UpdraftPlus for automated backups or rely on your hosting control panel.
If you prefer a hands-on approach, manually download files using FileZilla and export your database via phpMyAdmin.
Can I Upgrade My VPS Plan Later?
Yes, you can upgrade your VPS plan later!
Just access your control panel or client area to initiate the upgrade process. Make sure all invoices are paid beforehand, as that's a requirement.
You might've options like live migration to preserve your data, but be aware of potential downtime and additional costs.
It's best to schedule upgrades during low-traffic times to minimize disruption.
Always check if your new plan meets your needs!
What Is the Difference Between VPS and Dedicated Hosting?
VPS offers shared resources and quick scalability, while dedicated hosting provides full resource utilization and unmatched performance.
With VPS, you enjoy affordability and ease of management; with dedicated hosting, you gain extensive customization and advanced security features.
If you're running a small website, VPS might suit your needs.
However, for high-traffic applications or sensitive data, dedicated hosting's isolation and reliability make it the better choice.
Consider your requirements carefully before deciding.
How to Troubleshoot Common WordPress Installation Errors?
To troubleshoot common WordPress installation errors, start by checking your database credentials in the 'wp-config.php' file.
If you encounter a white screen, consider disabling plugins or switching themes.
For internal server errors, renaming the '.htaccess' file might help.
Always check your server logs for detailed error messages.
Updating PHP and WordPress can prevent compatibility issues, and clearing your cache may resolve outdated file problems.
Don't hesitate to reach out to support if needed.
Conclusion
In the world of web hosting, setting up WordPress on your VPS is like planting a garden. With the right preparation and care, you'll see your online presence flourish. Just as a gardener nurtures their plants, you'll need to optimize and secure your site to ensure it thrives. Remember, a well-tended garden not only grows but also attracts visitors. With your new WordPress site, you're ready to cultivate creativity and connect with the world. Happy gardening!